
I've been working on a number of projects just recently.... literally just yesterday I finished working alongside a friend on Heni's birthday mural... (blog post coming up soon!) I've also had a project going on making some planter boxes for the area near the mural on the deck to name just a few.
It seems like I've been on a creativity adventure...
Today I hope that you will forgive me for putting up another "Sanity Space" posts about one of the projects I finished a little while ago.
About a month ago I had the chance to go on a free hand machine embroidery and applique course run by Katie Essam. I came across her work at the Knitting and Stitching Show at the beginning of the year and decided to get a few girl friends together for a fun morning of receiving some tuition and learning a new skill/craft.
Unfortunately one of the group broke her wrist a few days before the workshop so it ended up with just me and one other friend participating. However... we had a great time and learned lots and below are some of the steps that Katie showed us during our time with her.
The first thing we were shown was how to prepare a machine for freehand embroidery with a special "foot" and by lowering the "feed dogs". I borrowed one of Katie's machines that was already set up as mine is not very reliable (I didn't want to worry about it not working on the day)

..... We were then taught how to maneuver some material (that had been stiffened with vilene) in various directions ...side to side, diagonally and around in circle....and practiced getting the hang of "writing with the machine"...


The next progression was to draw a shape with a pen and then try to sew accurately along the lines that we drew....this proved to be a little harder than the previous exercise but we soon got the hang of it!

Katie talked us through each of the many stages of putting the project together ....

For my piece I decided to amalgamate two photos... one of a field with seed heads, hedgerow and sky....

....one of birds ....

and I also decided to add a gate for some interest to the composition and make it a little more work!

We were given 3 x A4 copies of the picture that we had decided up on and then cut 2 of them up to create the individual pieces of the pattern.

I cut out patterns for 5 birds, a hedgerow, a gate and a field
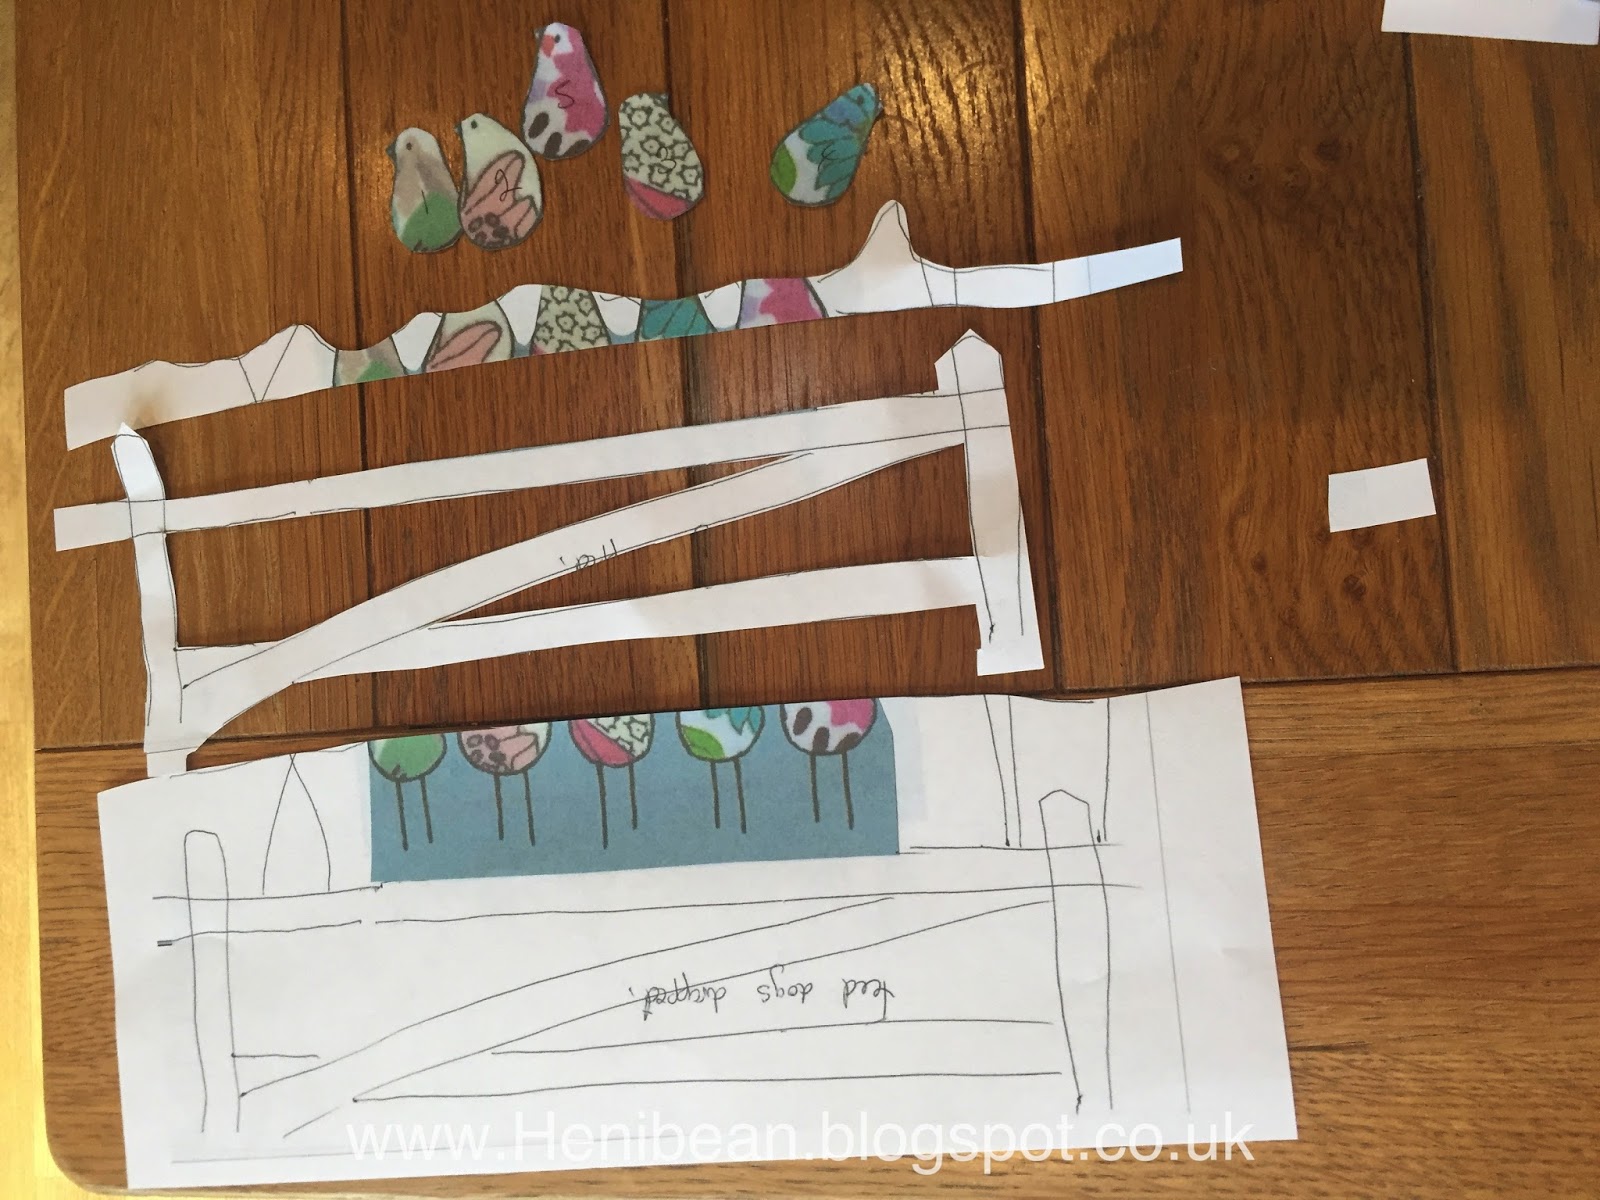
After cutting the pattern we traced the picture of the third A4 copy and drew on any lines we wanted to later stitch with the machine.

We drew around the pattern templates on to some Bondaweb and cut around each one leaving a little extra room. The bondawed was then ironed on to the fabrics we had chosen and then cut out more accurately.


A rectangle of fabric (with the vilene ironed on the back) was chosen for the back drop ... and starting at the back (with the field and hedge) we then layered the other pieces (the gate and birds) on top. The bondaweb backing paper (on each of the pattern pieces) was peeled off and the templates were individually ironed back in place (so the glue on the web adhered the material to each other). The tracing paper plan was used to ensure that they were all placed in the correct locations.

Next we pinned the tracing paper pattern on top so that we could see where we needed to stitch.

The
paper was stitched to the material and each drawn line was used like a
"map" and sewn over twice with thread (I chose black thread to make it
more visible)...

We were then shown how to remove the paper by tearing, using tweezers, a scalpel and finally a lint roller.

....revealing the finished product...
Here's mine below....

...and here is my friend's composition which consisted of a potted geranium and some books...


I was surprised at the amount of work and number of processes that went in to each of the pieces and found that It was a fully absorbing activity in which time seemed to speed by. The course was three and a half hours long and we were able to finish our individual pieces in that time frame quite nicely.
At the end of the morning we were given a full set of instructions with all the varying stages
so that we could remember how to do it all again! We also decided to purchase some of the basic materials from Katie so that we would be able to practice sewing a few other pieces at home by our selves.
It was a fun morning and in the end we were very happy with our compositions...especially seeing as it was our first attempt at doing something like this.... I decided to go out and purchase a matting for mine and I have a plan to eventually hang it above my old singer sewing machine in my craft room... however, first I need to find a frame or maybe even create a home made one from some scrap pieces of wood we have lying around....sounds a good idea for another sanity space project if you ask me!
Anyhow, I hope that by seeing our mornings "work" you will feel a desire to go learn a new skill...or feel inspired to start something fun that you've been meaning to do... but haven't quite gotten round to yet. Whatever you do...I hope that you too can go on a creative adventure of your own this week. Have fun!
Jx

Your finished product is beautiful!
ReplyDeleteHeni and Jade:
ReplyDeletewhat a wonderful course you two and your team did.
That is beautiful! It has a rustic feel that I just love!
ReplyDeleteHow cute I love the birds! Thanks for joining the Family Joy link party.
ReplyDeleteThanks Sylvia. I'm definitely going to have another go when I get the chance. Hope that you feel inspired to try something new too X
ReplyDeleteHi, I'm visiting from #livefreeThursday. Blessings & peace to you!
ReplyDeleteBeautiful work. The birds are so pretty.
ReplyDeleteI love both creations and especially your birds. It will take more than just a quick moment to let it all sink in. What an amazing experience for you and your friend. Some time back; my daughters and I took a craft class to make a straw broom with a flower arrangement on it. I am NOT crafty, but with the help of the teacher, mine was okay. Thank you for sharing with us here at Tell me a True Story.
ReplyDeleteWow! That is so much work! You really made an adorable piece of art there. Thanks for sharing your creativity at Together on Tuesdays :)
ReplyDeleteThis is so cool... I love seeing how creative other people! I am so not creative like this...
ReplyDeleteThanks for sharing with #TheCozyReadingSpot
Marissa